Maximize Your Space: Storage Tips for Manufactured Homes

Living in a manufactured or modular home often requires creative thinking when it comes to storage solutions. With limited space to work with, maximizing available areas can significantly impact your comfort and organization. Let’s explore practical tips to help you make the most out of your space.

Utilize Vertical Space

Vertical space is often overlooked in smaller homes. Installing shelves or floating shelves high on walls can provide extra storage without taking up floor space. Consider stacking storage bins or boxes upwards, ensuring they don’t interfere with ceiling fixtures. Use tall bookcases or cabinets that reach almost to the ceiling to store items that aren’t used daily.

Multi-functional Furniture

Invest in furniture that offers more than one function. A bed with built-in drawers underneath can serve as both a sleeping area and a storage solution. Look for coffee tables with storage compartments or sofas that can double as guest beds. These pieces of furniture help to save space while providing additional storage without cluttering the room.

Declutter Regularly

Decluttering is not just an occasional activity; it’s a lifestyle choice for those with limited space. Regularly assess what you truly need and what can be donated or discarded. Implementing a policy of “one in, one out” can also be very effective in maintaining order and avoiding overcrowded spaces.

Optimize Closet Space

Closets in manufactured homes may not be large, but they can be optimized. Use double hanging rods to take advantage of vertical space inside the closet. Add shelf dividers to keep everything organized and within reach. Consider using vacuum-sealed bags for out-of-season clothing to save space.

Creative Use of Small Spaces

Identify small, unused areas in your home and make them functional. Corners, nooks under the stairs, or even behind doors can become valuable storage spots. Install corner shelves, hang hooks, or use over-the-door organizers to make the most of these areas.

Kitchen Storage Solutions

The kitchen is often the most challenging space to keep organized in a manufactured home. Consider installing pull-out pantry shelves to maximize cabinet space. Magnetic strips on the wall can hold knives or spices, freeing up counter space. Use stackable containers for dry goods to keep your shelves neat and accessible.

Utilize Door Space

Doors can double as storage solutions without sacrificing style. Use over-the-door racks for shoes or cleaning supplies. Mount hooks or pockets on the inside of cabinet doors to store small items like cleaning brushes or extra sponges, keeping them out of sight yet easily accessible.

Under-Furniture Storage

The area under furniture is often underutilized in manufactured homes. Buy or repurpose storage boxes that can fit under your couch, bed, or dressers to store seasonal items, extra bedding, or other occasional-use items. This method is excellent for keeping items out of sight yet readily available when needed.

Label Everything

Once your storage solutions are in place, label everything. Labels ensure everyone knows where things belong and can greatly reduce the time spent searching for items. This simple step helps maintain an organized environment and makes tidying up a breeze for everyone in the household.

By implementing these practical, space-saving tips, you can optimize your manufactured or modular home’s storage capacity while keeping it stylish and functional. The key is to assess your space, get creative with solutions, and ensure everything has its place. A well-organized home not only enhances your living environment but also contributes to a more stress-free lifestyle.

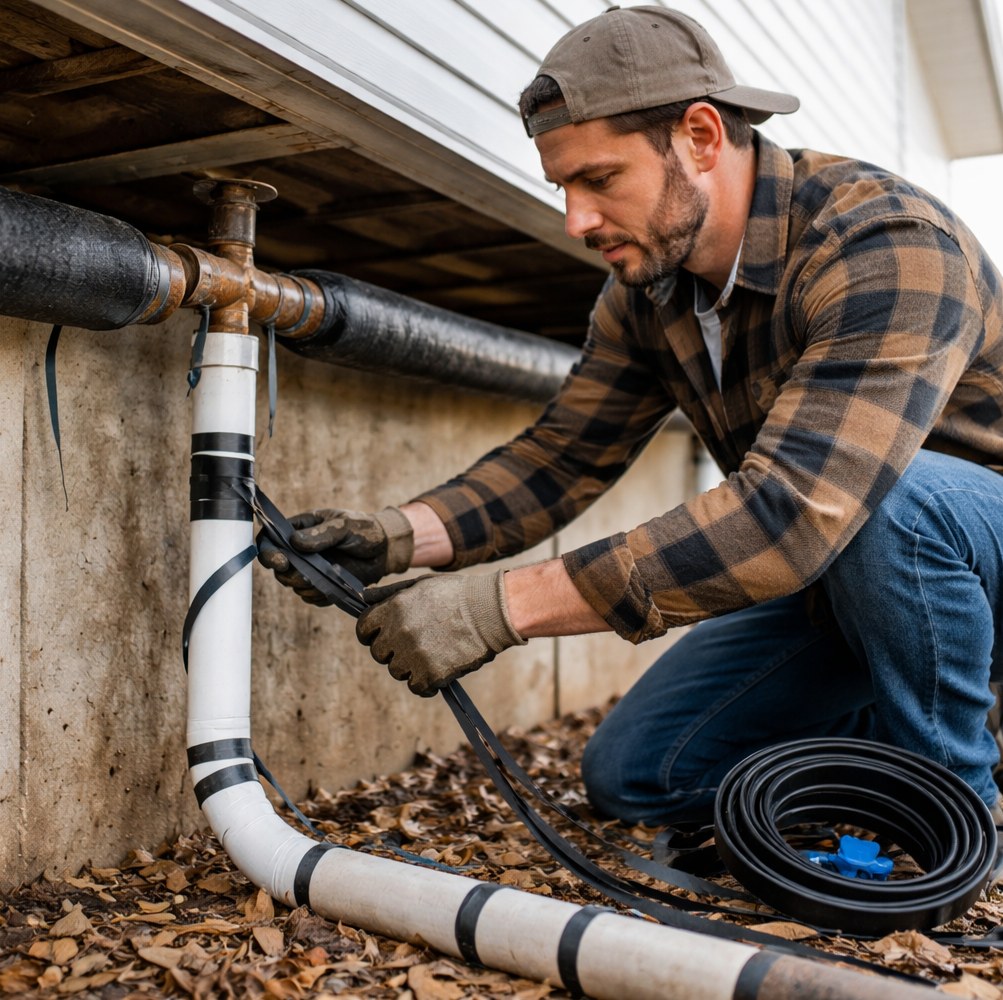
Protect Your Modular Home: Prevent Frozen Pipes with Heat Tape

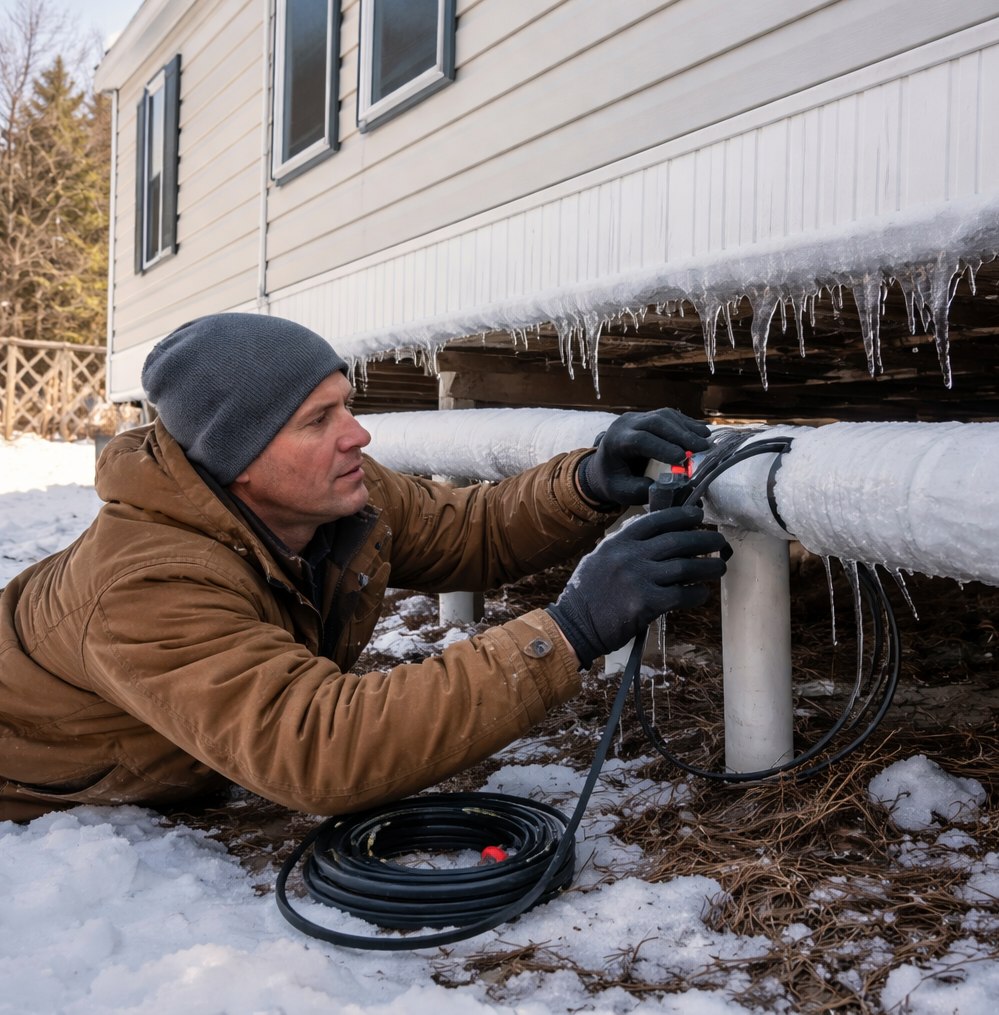
Winter can be a harsh season for modular and manufactured home owners. As temperatures drop, the threat of frozen pipes looms large. A frozen pipe not only disrupts daily activities but also poses the risk of bursting, leading to costly water damage. If your home has been the victim of this winter menace, understanding how to prevent it is crucial.

One of the smartest investments you can make is installing heat tape. This tool acts as a thermal guard for your pipes, ensuring that water continues to flow even when winter is at its fiercest. But before you rush to wrap your pipes, let’s delve into how this works and the steps to install it effectively.

Understanding Heat Tape

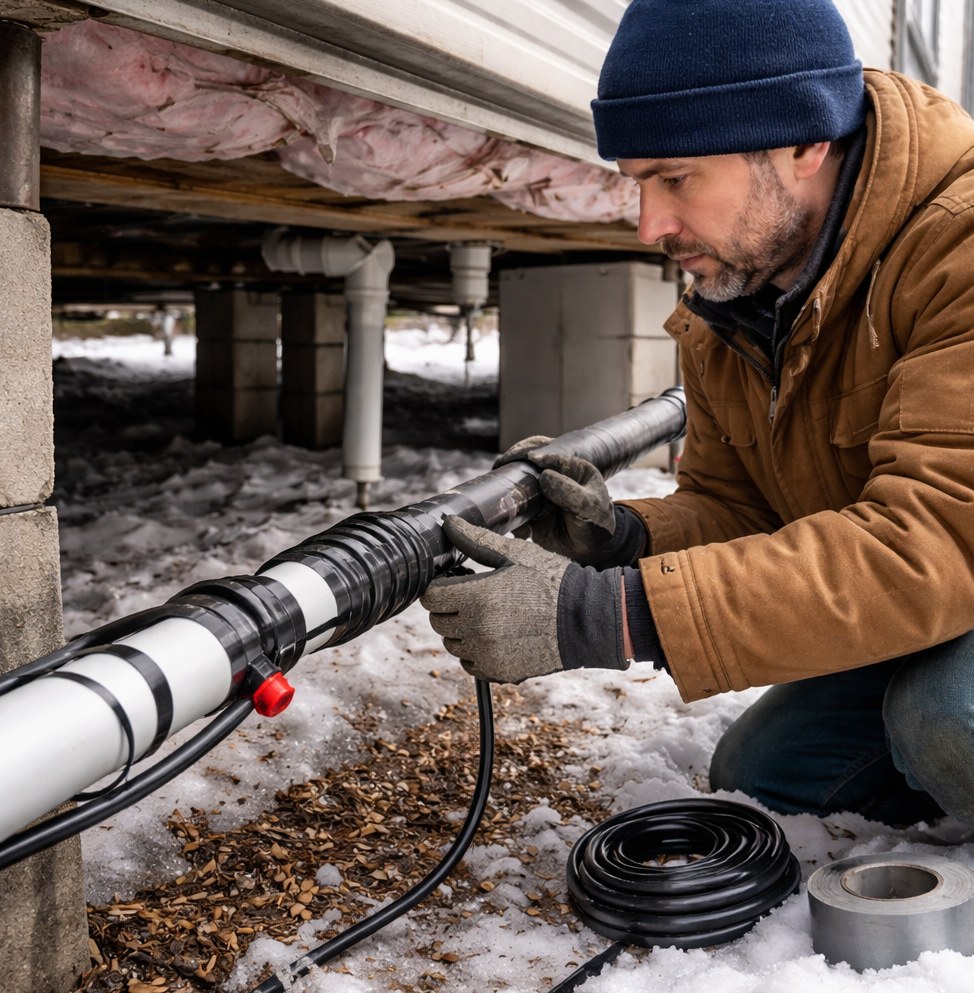
Heat tape is an electrical cable that you apply directly to pipes, providing warmth to prevent freezing. Designed specifically for pipes, it maintains a consistent temperature around the surface. It’s an ideal solution for modular and manufactured homes that often lack the deep foundations and insulation seen in traditional houses.

Steps to Installing Heat Tape

  1. Choose the Right Heat Tape: Not all heat tapes are created equal. Opt for one that’s suitable for your pipe material—whether it’s PVC, copper, or galvanized steel. Also, check if the heat tape is appropriate for indoor or outdoor use, depending on where your pipes are located.
  2. Insulation Check: Before applying heat tape, inspect your pipes for existing insulation. If old or damaged, replace it to ensure maximum efficiency.
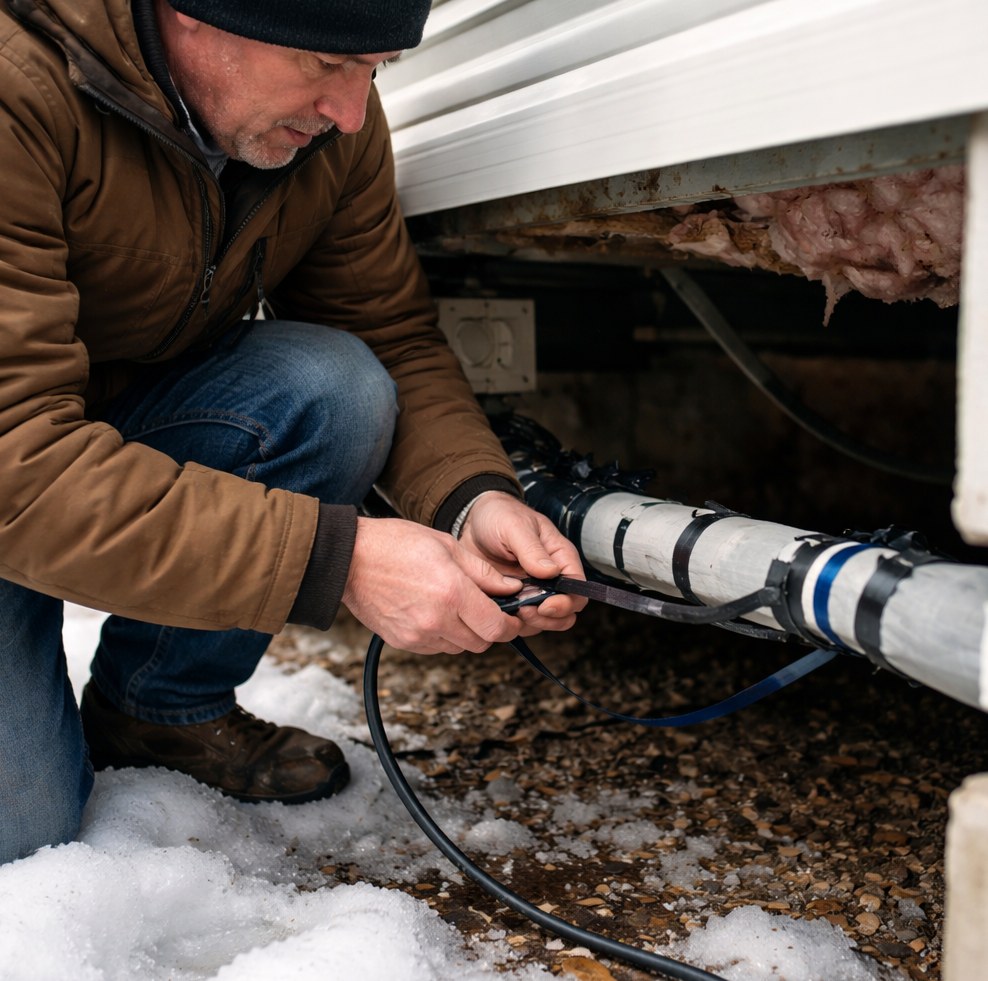
  3. Measure and Secure: Measure the length of the pipe you’ll cover and cut the heat tape to match. Start attaching the tape from one end, using electrical tape or zip ties to secure it every 6 inches. Ensure that the tape lies flat against the pipe surface.
  4. Plug in Safely: Once installed, plug the heat tape into a GFCI-protected outlet. These outlets prevent electrical shocks and are recommended for wet areas.

Additional Tips for Preventing Frozen Pipes

While heat tape is a strong ally in the fight against frozen pipes, implementing a few more strategies can offer added protection. First, ensure that your home’s skirting is intact to shield pipes from cold winds. Another useful tactic is to keep a trickle of water flowing through faucets during extremely cold days; moving water is less likely to freeze.

Regular maintenance checks also go a long way. Inspect your pipes and heat tape periodically for any signs of wear or damage. Early detection can save you from bigger headaches down the line. Finally, seal any gaps or cracks around your home that could let in cold air. This step not only aids in pipe protection but also improves your home’s energy efficiency.

In conclusion, as a modular or manufactured home owner, the battle against frozen pipes can indeed be won. By investing in quality heat tape and adopting preventive measures, you can ensure that your plumbing system remains functional throughout the winter months. So, take the initiative today and equip your home against the icy grip of winter.

Solutions for Skirting and Belly Board Issues in Modular Homes

Modular homes are a popular choice for those looking for affordable and efficient housing. However, owners often face issues with skirting and belly boards. These components are crucial in protecting the home from weather elements and pests, ensuring longevity and comfort. Addressing these issues promptly can save homeowners a lot of hassle and potential damage costs.

Understanding Skirting in Modular Homes

Skirting is the barrier that wraps around the base of a manufactured home. It acts as a protective layer, shielding the underside of the home from external elements. A common problem is skirting damage, often caused by wind, pests, or accidental impacts. Damaged skirting not only affects the home’s appearance but can compromise its insulation and allow moisture buildup underneath.

To repair or replace skirting, first identify the material of your skirting. Most are made of vinyl, metal, or concrete. Each has its own repair methods. Vinyl is perhaps the easiest to replace, as damaged panels can be removed and new ones snapped into place. For metal skirting, small holes can be patched with metal adhesive products. Concrete skirting may require professional help for significant cracks or structural issues.

The Role of Belly Boards

Belly boards, or underbelly, are located beneath the floor of the home and serve as a barrier against moisture, pests, and cold air. Issues with belly boards typically arise from improper installation or wear over time, allowing elements to seep in and cause damage to insulation and flooring.

Regular inspection is crucial. Check for signs of moisture, tears, and sagging. If you discover damage, patching with vinyl belly board tape or spray adhesive can be effective for minor repairs. For significant issues, replacing sections might be necessary. It’s important to maintain a balance between ensuring a secure barrier and allowing necessary ventilation to avoid mold growth.

Preventive Measures to Consider

Prevention is key in minimizing issues with skirting and belly boards. Regularly inspect these areas for signs of wear or damage. Ensure that gutters and drainage systems direct water away from the home’s base to reduce moisture exposure. Trim plants and maintain a clear perimeter around the home to prevent pests from reaching the skirting.

In high-wind areas, securing skirting panels with extra stakes or wind braces can help prevent panels from being dislodged. For belly boards, consider using insulation supports to keep the covering snug over time.

Maintenance Tips

A regular maintenance routine can prolong the life of your skirting and belly boards, reducing the chances of extensive repairs. Clean skirting panels with a gentle soap solution to prevent dirt buildup, which can lead to staining and wear. Inspect the underside of your home annually to ensure that the belly board remains intact and functional.

Protecting Against Pests

Pests can wreak havoc on both skirting and belly boards. To mitigate this, use pest-resistant materials and apply sealants at potential entry points. Installing screens over vents and maintaining a clean yard free of debris will also help deter pests.

In the end, being proactive with inspections and maintenance can save modular home owners significant time and money. Focusing on these aspects will ensure the longevity and comfort of your living space, providing a secure and pleasant home environment.

Efficient Moving Tips for Manufactured and Modular Homes

Packing and moving a manufactured or modular home requires a strategic approach due to their unique structures and setup requirements. Unlike traditional homes, these homes offer different challenges, but with proper planning, the moving process can be smooth and efficient.

The first step in moving is to evaluate the entire home for potential issues. Checking the structural integrity of the home before any major move is crucial. Inspect the exterior for any signs of damage or wear, particularly focusing on the roof and undercarriage. Confirm that the utilities like water, sewage, and electrical connections are functioning properly before you start packing.

When it comes to packing, organization is crucial. Start by sorting your belongings into categories: essentials, non-essentials, and items to donate or discard. This method not only simplifies the unpacking process but also reduces the amount of unnecessary items you carry with you. Labeling boxes according to the room they belong to can save a tremendous amount of time during the unpacking phase.

One of the unique aspects of moving a manufactured or modular home is dealing with the furniture. Unlike traditional homes, many items might be custom-fitted or built into the structure. It’s important to identify which pieces are standalone and which require disassembling. Secure any loose parts or hardware in clearly labeled bags to ensure easy reconstruction later.

Managing your kitchen and appliances also requires careful attention. If your home includes built-in appliances, ensure they are properly disconnected following the manufacturer’s guidelines. For larger appliances, consider professional assistance to avoid damaging the units or causing injury. Take extra care with refrigerators; they need to be defrosted and dried out at least 24 hours before the move.

For smaller and fragile items, use soft packing materials like bubble wrap or fabric to cushion them. Packing plates vertically rather than stacking them can help prevent breakage. Clearly mark boxes containing fragile items so that they are handled with care during the moving process.

Don’t forget to secure necessary permits for moving your home. Depending on the distance and local regulations, moving a manufactured or modular home might require special permissions. Work with a professional moving company familiar with these types of homes to ensure compliance with all relevant laws and regulations.

When it’s time to actually move the home, ensure all external items like skirting, stairs, and porch covers are removed and stored safely. Double-check that everything inside is securely fastened down or removed entirely. Heavy items should be placed on lower levels to maintain balance during transport. This reduces the risk of tipping or damage.

If your move involves a considerable distance, plan for stops along the way. This allows for checking that the home and its contents remain secure. Professional moving companies often handle these checks, but if you’re managing the move personally, frequent inspections are necessary.

Preparing your new site is just as important as packing up the old one. Ensure the ground is level and solid enough to support the structure by consulting with experienced installers. Having utilities connected and ready upon arrival will make settling into your new location much faster.

Moving a manufactured or modular home might seem daunting at first, but with due diligence and strategic planning, it can be executed smoothly. The key is to address each aspect methodically, from initial inspections to final setups. Being organized and methodical not only makes the process easier but also helps you start life in your new location on the right foot.

Essential Tips: Water Preparedness for Earthquake Survival

When disaster strikes, particularly earthquakes, having a solid water preparedness plan can make a significant difference. Earthquakes can disrupt essential services, leaving people without access to clean water. Here’s how to ensure you’re ready when the ground starts shaking.

Understanding Water Needs

Firstly, know your water requirements. An individual needs a minimum of one gallon of water per day for drinking and sanitation. Consider the needs of each family member, including pets. For comprehensive preparedness, aim for a two-week supply. Calculate based on the number of people and animals in your household.

Storage Solutions

Storing water effectively is as crucial as knowing how much you need. Use food-grade water storage containers. These are typically made from durable plastic, metal, or glass, ensuring contamination-free water. Consider large containers like water barrels for long-term storage, supplemented by smaller containers for portability in case of evacuation.

Sanitation and Filtration

Despite careful storage, water can become contaminated over time. Having a water filtration system is vital. Simple options like water purification tablets or portable filtration devices can remove bacteria and other harmful substances. Being prepared with these tools ensures access to safe drinking water, even when supplies run low.

Rotation and Refill

Stored water has a shelf life. Regularly check and rotate your supply to maintain freshness. Generally, replace stored water every six months. If you’ve pre-treated the water with purification tablets, follow the manufacturer’s guidelines for rotation.

Sources and Collection

In prolonged emergencies, even well-prepared water reserves might dwindle. Knowing alternative water sources is crucial. Identify potential nearby sources such as streams or rainwater. Invest in equipment to collect and purify these water sources, ensuring they are safe for consumption. Remember, not all readily available water is potable without proper treatment.

Education and Training

Understanding water survival skills is just as important as having the resources. Consider taking a survival course that covers water purification techniques. Empowering yourself with this knowledge means you can adapt to unforeseen circumstances, ensuring you and your family remain hydrated and healthy.

Include a Plan for Pets

Pets need water too. Plan for their needs by including them in your calculations. While they may be able to drink from natural sources, these should still be purified. Prioritize their safety with clean water just as you would for human family members.

Communication Plan

Have a communication plan in place that includes when and how to use your water reserves. Knowing in advance who will manage the water supply can help reduce confusion during an emergency. Make sure all family members are aware of the plan and their roles.

Community Involvement

Building a network with neighbors can be invaluable. In emergencies, sharing resources and information can benefit everyone involved. Establish a community plan for pooling resources and supporting each other in times of need.

Water preparedness is not just smart but essential for survival during an earthquake. Proper planning, storage, and knowledge will ensure access to clean water when you need it most. These steps can offer peace of mind and a higher likelihood of staying healthy when traditional water sources are disrupted by natural disasters.

Essential Repair and Safety Tips for Modular Home Owners

Owning a modular home presents unique challenges, especially when it comes to maintenance and safety. If you’re a modular home owner, understanding how to uphold the structural integrity and ensure the safety of your space is crucial. This guide aims to arm you with essential repair and safety tips to help keep your home secure and well-maintained.

Regular Inspections

One of the most important habits you can develop is conducting regular inspections of your modular home. A thorough checkup every six months can reveal issues that may not be obvious at first glance. Pay particular attention to your home’s joints and seams; these are crucial areas where wear and tear can lead to water infiltration. Proper seals ensure that your home remains energy-efficient and free of mold or mildew.

Foundation Maintenance

The foundation of your modular home requires as much attention as the house itself. Inspect the foundation for cracks, which can allow water to seep in and destabilize the structure over time. If you notice any significant shifts or degradation, seek professional assessment and repair immediately. Maintaining a sturdy foundation is key to the long-term durability of your home.

Roof Repairs and Upkeep

Your roof acts as the first line of defense against the elements. Regularly inspect it for missing or damaged shingles and ensure gutters and downspouts are clear. Water pooling on your roof due to clogged gutters can lead to significant damage. Ensure your roof is properly insulated to enhance energy efficiency and reduce utility bills.

Electrical System Checks

The electrical system in modular homes can deteriorate over time. Be vigilant for flickering lights, circuit breakers that frequently trip, or outlets that don’t work. Have a certified electrician inspect your wiring every few years to identify potential hazards and ensure the system functions safely and efficiently.

Plumbing System Vigilance

Plumbing problems can be costly if not addressed promptly. Regularly check under sinks and around toilets for leaks. Make sure your home’s plumbing is winterized if you live in a cold climate. Insulated pipes are less likely to freeze and burst, which can prevent costly water damage.

Safety Alarms and Detectors

Ensuring your safety devices are in working order is non-negotiable. Change the batteries in smoke detectors and carbon monoxide alarms annually. Test these devices to confirm they’ll alert you during an emergency. Installing smart detectors can provide additional safety assurance by sending alerts to your phone.

Emergency Preparedness

Keeping an emergency kit is wise. Stock it with essentials like water, non-perishable food, flashlights, and batteries. Make sure everyone in your household knows where the kit is located and what the emergency plan is in case of natural disasters or sudden evacuations.

Insurance Check

Last but certainly not least is evaluating your homeowner’s insurance. Ensure your policy covers the unique aspects of modular homes, such as transportation and setup. Review your coverage limits and make adjustments as needed to protect against potential hazards specific to modular living.

By incorporating these practices into your routine home care, you lend longevity and stability to your modular home. Awareness and proactive maintenance are your best allies in preserving the comfort and safety of your living space. With these tips, you’re well on your way to maintaining a secure and efficient modular home.

Installing Heat Tape: A Guide for Manufactured Homes

Living in a manufactured or modular home brings unique challenges, especially when it comes to plumbing systems. During colder months, one of the key concerns is preventing pipes from freezing. This is where heat tape comes in—a simple yet effective tool that can save you from the hassle and expense of burst pipes. Below is a step-by-step guide for installing heat tape on your manufactured home.

Choosing the Right Heat Tape

The first step in the installation process is selecting the appropriate heat tape. Not all heat tapes are created equal, and using the wrong type can be ineffective or even hazardous. Make sure to purchase heat tape specifically rated for the pipes in your home. Check the length and wattage requirements to ensure you cover the entire length of your exposed pipes.

Preparation is Key

Before you begin the installation, gather all necessary tools: tape measure, electrical tape, and a utility knife. Make sure the area around your pipes is clear; having obstacles can complicate the installation process. It’s also crucial to ensure the power source is suitable for the heat tape you’re using, as some tapes may require a specific voltage.

Installing the Heat Tape

Begin by measuring the length of the pipe that needs heating. Cut the heat tape to the appropriate length, allowing a small margin for error. Unroll the tape and attach it to the pipe, following the specific spiral or straight-line guidelines provided by the manufacturer. Avoid crossing the tape over itself, as this can cause overheating. Use electrical tape to secure the heat tape every 12 inches, ensuring it stays in place.

Pay special attention to joints and bends in the pipes. These areas are more susceptible to freezing and require extra care. For bends, ensure the tape maintains contact with the pipe and doesn’t lift off. This ensures consistent heat distribution along the entire length.

Insulating the Pipes

Once the tape is in place, insulation is your next line of defense. Choose pipe insulation that is compatible with the type of pipe and heat tape you’re using. Wrap the insulation securely over the heat tape, maintaining a snug fit. This layer provides an additional barrier against cold air and helps the heat tape work more efficiently.

Perform a Safety Check

Before plugging in the heat tape, conduct a thorough safety check. Look for any visible signs of damage, such as cuts or frays, in the tape or its connections. Securely fasten any loose ends, and verify that the installation complies with the manufacturer’s guidelines. Once satisfied, connect the heat tape to the power source.

Monitoring and Maintenance

After installation, it’s important to regularly monitor the performance of the heat tape. Check periodically to ensure it’s functioning correctly, and pay attention to any unusual noises or smells. Performing routine maintenance helps extend the life of your heat tape and ensures your plumbing system remains operational throughout the winter months.

Heat tape is an essential tool for anyone living in a manufactured or modular home in cold climates. With proper installation and maintenance, it safeguards your pipes from freezing, saving you a significant amount of trouble and repair costs. By following these guidelines, you can efficiently install heat tape and protect your home from the elements.

Stay warm, keep your plumbing in check, and enjoy a hassle-free winter!

Drywall Installation Guide for Manufactured and Modular Homes

Drywall Installation Guide for Manufactured and Modular Homes

When it comes to installing drywall in manufactured and modular homes, one must approach the task with precision and attention to the unique challenges these types of homes present. These homes often require specialized techniques due to their construction and the materials used.

Preparation is Key

The first step in this process is to ensure the walls are ready to receive the drywall. Check for any uneven surfaces or protruding nails, and correct these issues before proceeding. It’s crucial to measure the spaces accurately. Manufactured and modular homes may have unique dimensions, and cutting the drywall to fit these exact measurements is essential to avoid wastage and ensure a smooth finish.

Choosing the Right Drywall

Selecting the appropriate type of drywall is critical. Depending on the climate and specific needs of your location, you might need moisture-resistant drywall or a thicker type for added insulation. Consider using a lighter drywall for ceilings and a heavier one for walls to ensure they can handle the weight while providing sturdiness.

Installation Techniques

When installing the drywall, start with the ceiling. This approach helps maintain alignment and structural integrity. Use a drywall lift if necessary, especially when working alone. Once the ceiling panels are secure, start on the walls. It’s essential to position the panels horizontally, as this offers more strength and reduces the number of seams, which can be a potential problem area if not handled correctly.

Securing the Drywall

Use drywall screws instead of nails to secure the panels. Screws provide a stronger grip and are less likely to pop out over time, which is a common issue in manufactured homes due to movement and settling. Ensure the screws are countersunk just below the surface to allow for a smooth finish when taping.

Taping and Finishing

Once the panels are secured, the next step is to tape the joints. Use paper tape and joint compound for the best results. Apply a thin layer of compound, then place the tape over it, smoothing it out to remove air bubbles. After the initial coat dries, apply two more coats of compound, sanding between each layer to achieve a seamless finish.

Dealing with Challenges

Manufactured homes can present unique challenges, such as uneven studs or limited wall space, making drywall installation more complex. It’s important to adjust your techniques accordingly. For instance, employing furring strips can help create a more level surface for the drywall installation.

Inspection and Maintenance

Once the installation is complete, inspect all seams and edges to ensure a proper finish. Over time, you may need to perform maintenance due to the natural settling of the home. Regular inspections can help catch any issues early, preventing more significant problems down the road.

Installing drywall in manufactured and modular homes requires a nuanced approach. By following these guidelines and being mindful of the unique features of your home, you can create a beautiful and lasting finish. The attention to detail in preparation and installation will pay off, resulting in a professional-looking and durable wall surface.

Winterizing Your Manufactured Home: Essential Tips and Tricks

As the colder months approach, it’s crucial to ensure that your manufactured home is ready to withstand the winter weather. Properly winterizing your home not only helps in maintaining a comfortable indoor temperature but also protects the structure from potential damage. Let’s dive into some essential tips and tricks to keep your manufactured home cozy and safe during the winter season.

Seal Drafts

Drafts can significantly increase heating costs and make your home feel colder. Conduct a detailed inspection of your windows and doors to identify any gaps or cracks. Applying weatherstripping or caulking around these areas can effectively seal drafts. Additionally, consider installing storm windows to provide an extra layer of insulation.

Insulate Pipes

Frozen pipes are a common issue in winter and can lead to costly repairs. To prevent this, wrap your pipes with foam insulation sleeves available at most hardware stores. Pay special attention to pipes located in unheated areas like basements or crawl spaces. For added precaution, keep a slow drip of water running through faucets during extremely cold temperatures.

Maintain Your Heating System

Before winter sets in, have your heating system professionally inspected and serviced. This ensures it’s operating efficiently and reduces the risk of unexpected breakdowns. Replace any old filters and make sure your thermostats are working properly. Consider investing in a programmable thermostat to better manage energy usage and maintain a comfortable home environment.

Skirting Inspection

The skirting around your manufactured home plays a vital role in preventing cold air from getting underneath and causing pipes to freeze. Ensure the skirting is intact and repair any damages promptly. Proper skirting also helps in retaining heat within your home, leading to reduced energy bills.

Insulate the Attic

Heat loss through the attic can be substantial. By ensuring your attic is adequately insulated, you can retain more heat inside your home. Use blown-in insulation or batt insulation, keeping in mind the recommended R-value for your region. An insulated attic not only keeps your home warmer but also reduces the strain on your heating system.

Check Roof and Gutters

Inspect your roof for any missing or damaged shingles that could allow water to seep in and cause further damage. Clean your gutters to prevent ice dams, which can cause water to back up and leak into your home. Ensuring proper water drainage protects your home’s structure and foundation.

Underpinning and Vapor Barriers

Inspect the underpinning of your home to ensure it is secure and in good condition. A properly maintained underpinning helps to reduce heat loss. Installing a vapor barrier on the ground in your crawl space can help prevent moisture buildup, which can lead to mold and mildew—a particular concern during winter months when ventilation is reduced.

Windbreaks

Planting windbreaks such as shrubs or installing a windscreen can significantly reduce wind exposure on your manufactured home. This simple measure can help maintain a higher internal temperature and guard against heat loss. Choose evergreen plants that provide year-round protection from wind.

Regular Maintenance Checks

Perform regular checks on all systems of your manufactured home throughout the winter. Early detection of any issues can prevent larger problems and ensure a safe and warm living environment. Paying close attention to the details can make all the difference in maintaining the comfort and safety of your home during the colder months.

Why an Extendable Coffee Table Is the Smartest Piece in Your Living Room?

In the modern living room, every piece of furniture must work harder than ever. With spaces getting smaller and lifestyles becoming more flexible, homeowners need designs that adapt effortlessly to changing needs. That’s why multifunctional furniture is no longer a luxury—it’s a necessity. Among these versatile pieces, one stands out for its blend of style, practicality, and sheer adaptability: the extendable coffee table. It’s not just a place to rest your coffee mug; it’s a dynamic centerpiece that evolves with your day-to-day life.

Extendable coffee table in a modern living roomOne of the main reasons to consider an extendable coffee table is its remarkable ability to transform your living space without requiring any permanent change. When closed, it behaves like a standard coffee table—perfect for placing snacks, books, or decorative pieces. But when the need arises, it expands, offering extra surface area for hosting friends, enjoying a meal, or working from home. This flexibility means you’re always prepared for both casual and unexpected scenarios.

The extendable coffee table is a master of adaptability. Imagine hosting a movie night: at first, it’s a hub for popcorn bowls and drinks. Later, you pull out its hidden extensions, and suddenly you have enough room for a board game spread. Or consider working remotely—rather than hunching over a laptop on your knees, you can raise and extend the table to create a makeshift desk. This ability to morph between functions saves you from clutter and reduces the need for multiple, single-purpose pieces of furniture.

Space-Saving Without Sacrificing Style

Urban apartments and compact homes demand efficient use of square footage. An extendable coffee table offers the rare advantage of expanding when you need it and retreating when you don’t, freeing up precious floor space. And unlike folding tables that can feel temporary or inelegant, well-crafted extendable designs blend seamlessly with your existing decor. The best models integrate the extension mechanism so discreetly that guests may not even realize it’s a transformable piece until they see it in action.

Designs to Fit Every Aesthetic

Gone are the days when multipurpose furniture meant compromising on style. Today’s extendable coffee tables come in a wide range of materials, shapes, and finishes: warm wood for a rustic or Scandinavian look, sleek glass and metal for a contemporary edge, or painted finishes for a minimalist aesthetic. Many designs incorporate clever storage solutions, such as drawers or hidden compartments, so you can store coasters, remotes, and chargers out of sight. It’s this blend of beauty and practicality that makes it a standout investment.

The Entertainer’s Secret Weapon

If you enjoy having people over, an extendable coffee table can elevate your hosting game. For casual gatherings, keep it compact to encourage flow and conversation. For larger get-togethers, extend it fully to create a buffet-style serving station or a communal game table. Some designs even adjust in height, making it possible to convert your coffee table into a dining-height surface in seconds. This adaptability allows you to host with confidence, no matter the size of your guest list.

Work-from-Home Benefits

Remote work has changed how we use our living spaces, and many people find themselves working from the living room at least part of the time. An extendable coffee table with height adjustment can serve as an ergonomic workstation, reducing strain compared to working from a couch with a laptop perched on your knees. Once the workday ends, you can lower it back to coffee table height, restoring the room’s relaxed atmosphere. This quick transformation helps maintain a mental boundary between professional and personal time.

Perfect for Families

Families will appreciate how an extendable coffee table adapts to different activities throughout the day. It can be the stage for kids’ arts and crafts in the afternoon, a snack hub for after-school treats, and later, a space for adults to enjoy wine and appetizers. Many models are built with durable surfaces that resist scratches and stains, making them a practical choice for busy households. Durability paired with flexibility ensures it will keep pace with the changing demands of family life.

Choosing the Right Model

Not all extendable coffee tables are created equal, so it’s worth considering a few factors before buying. Look at the extension mechanism—does it operate smoothly, and can it be handled by one person? Check the stability when fully extended; a quality table should feel solid and secure. Materials matter too: solid wood and reinforced frames will last longer than cheaper composites. And think about proportion: the table should complement your seating area whether extended or compact. A well-proportioned piece will always look intentional, not like an afterthought.

Maintenance and Care

Keeping your extendable coffee table in top condition is straightforward. For wooden models, regular dusting and occasional polishing will preserve the finish. Metal parts of the extension mechanism can be lightly lubricated to maintain smooth movement. If your table has a glass top, a microfiber cloth and glass cleaner will keep it streak-free. Regular upkeep ensures that the table remains a pleasure to use and looks its best for years to come.

Investment Value

While an extendable coffee table might cost more than a standard one, the value it offers is undeniable. By replacing the need for multiple pieces of furniture—a coffee table, a small dining table, a game table—you save money, space, and time. Quality models often become long-term staples, moving with you from one home to the next and adapting to each new space. It’s an investment in both functionality and style, with returns you’ll notice every day.

Customization Options

Many manufacturers now offer customization, allowing you to choose the dimensions, finishes, and even the type of extension mechanism. This means you can find a table that fits your living room perfectly and reflects your personal style. Customizable options can include storage features, integrated charging ports, or even matching side tables. Tailoring the table to your needs ensures it becomes an integral part of your daily routine.

Eco-Friendly Choices

For those mindful of sustainability, extendable coffee tables can be a green choice. By investing in one versatile piece instead of multiple single-function items, you reduce material consumption. Many brands also prioritize responsibly sourced wood, recycled metals, and non-toxic finishes. Choosing a durable, adaptable table means fewer replacements over time, further reducing your environmental footprint. Practicality and sustainability can go hand in hand when making thoughtful furniture choices.

Blending with Your Lifestyle

Ultimately, the true brilliance of an extendable coffee table lies in how effortlessly it integrates into your life. Whether you’re a city dweller in a compact apartment, a busy parent juggling multiple activities, or a professional working from home, this piece adapts to your needs without compromising on aesthetics. Its ability to shift roles—from coffee table to dining space to workspace—makes it more than just furniture. It becomes a partner in how you live, enriching your space and simplifying your routines.

In a world where flexibility and efficiency are prized, an extendable coffee table proves itself as a smart, stylish, and enduring choice. It adapts to changing circumstances, supports a variety of activities, and enhances the overall flow of your living space. Once you experience the convenience it offers, you’ll wonder how you ever managed without it.